Saturday, January 14, 2023

The Passing of Tom Gaspick

Tom Gaspick sadly passed away today in the early AM of January 14th after a short battle with Cancer. 

He will be missed and remembered by all those who loved him and all those he touched with his writing. 

Details of his funeral will be posted here when available. 

Sunday, April 12, 2020

Revell No. 85-1507: Kenworth W900 Aerodyne


Following are a few notes regarding the model's construction.

Re 'SnapTite' Construction

Much if the model employs a pin-and-socket 'SnapTite' joinery method. Paint introduces a complication, in that paint on pins and in sockets tends to interfere with fit. Often, pins need to be scraped, and/or sockets need to be reamed in order to reestablish fit.

- - -

Snags

Fuel Tank Pins And Sockets

The fuel tank halves are meant to be assembled by way of pin-and-socket connections. Each tank incorporates three such connections.

The sockets are too shallow to accept the pins. Drill out the sockets with a No. 55 (0.052") drill, and the connections will go together fine.

Rear wheels

The spacers, item 51, seem to introduce a wobble to the wheels. One can minimize the effect by nudging the tires about, but one can't get the wheels perfectly true.


Air Cleaners

These are very similar to the fuel tanks, and suffer from a similar, though not quite as severe, problem. Drill out the sockets with a No. 55 (0.052") drill.

- - -

Decal Disappointment -- FRIDAY, APRIL 10, 2020

I like what decals do for a model, but I don't much like applying them. The decal set has an elaborate 'lightning bolt' scheme that I quite liked the looks of, and wanted to apply. However, I could not get the large lightning bolts for the sides of the sleeper to work out. The decals seemed to be oversize for the space available for them, and the decals' 'laciness' defied my attempts to get them in place flat and true. I had to abandon the attempt.

I did apply some of the lightning bolt decal set in a very abbreviated manner. The result is not bad, and will have to do. Anyway, here's the finished model.


# # #


# # #

Monday, April 6, 2020

Tamiya 1/48 North American RAF Mustang III


Tamiya Item No. 61047-2500.

- - -

I was given this kit. It's not something I would have thought to buy for myself.


I may have done some aircraft models in my boyhood, but I've done none in adulthood, so I have effectively no experience with aircraft models. They look to me to be a whole nother world from the automobiles and trucks that I'm accustomed to.

It looks to me that painting an aircraft model would be a challenging bit of business. I'm not sure I can afford an airbrush outfit, so I may have to fall back on brush painting, which doesn't really appeal to me. We'll see.

Anyway, on with breaking out components, trimming them, test fitting them and organizing them into numbered and named bins per the plan's construction sequence.

- - -

An Observation -- SUNDAY, APRIL 5, 2020

1/48 scale components are tiny! I'm in awe of anyone who is skilled at dealing with such things.

- - -

A Snag: Items A27 And A28 In Step 6 -- Attaching Flaps

Items A27 and A28 each have nubs on them that are supposed to mate with dimples on the wing undersurface. There are no dimples.

- - -

Set Aside

Given my current skillset, I'm in no way capable of building and painting this model. I'll set it aside for now.

# # #


# # #

Wednesday, March 18, 2020

Tamiya Nissan Skyline GT-R, V-spec II (R34), 1/24


An exquisite kit with clear instructions.

Following are a warning, and a deviation from the instructions' order of body assembly that may be helpful.

A Warning

This is with regard to the clear windows, item D8.

The windows come with a sheet of masks that are to be applied to the inner surfaces, so that black paint can be applied to create window 'frames' of a sort. Do not, under any circumstances, use spray paint to do the black painting. Use only Tamiya X-18 semi-gloss black brush paint. Using spray paint will result in this.

The strong solvents in the spray paint bleed through the masks and fog the clear plastic something fierce.

I had to order replacement clear parts (sprue tree 'D') and a masking sheet from my local hobby shop. Had those items not been available, the kit would have been a write-off.

A Deviation

The instructions would have you assemble body components as you go along with construction of the kit. That hugely complicates painting. I wanted to be able to paint the complete body as a unit, so I pre-assembled all the body components. The pertinent components are:

  • The body itself, of course.
  • The front bumper, item B19.
  • The rear bumper, item B18.
  • The rocker panels, items B9 and B10.
  • The wing mounts, items B14 and B15..
With all of those items assembled, one has a complete body that can be painted all at one go. Pre-assembling the body does not result in any anomalies in the order of construction.

- - -

And here's the finished model.


# # #


# # #


Sunday, November 25, 2018

Studebaker Avanti -- AMT Kit No. AMT780/12


[NOTICE -- THURSDAY, OCTOBER 10, 2019:

I got as far with this kit as the exhaust pipes installation, at which point I decided to pack it in. The kit is not buildable.

My advice is to avoid AMT kits, across the board. They are utter trash, and into the trash is where this one ended up.]

- - -


I normally avoid AMT kits because I've found their quality to be dreadful. However, for the sake of this subject, I decided to take my chances and see what I can make of an AMT kit.

A gold sticker on the face of the box says, "SPECIAL 50th ANNIVERSARY EDITION. INCLUDES EXCLUSIVE HISTORICAL PHOTO BOOKLET"

The kit offers three build variants -- stock, custom and racing. While I'm inclined to always do stock builds, I'm tempted to do the racing variant for the sake of the decal set. I find that decals can really add life to a model, and the Avanti might really benefit from a decal set. We'll see.

The kit also features opening doors and steerable wheels. Those are challenging things to achieve in 1/25 scale. We'll see how they turn out.

Anyway, it's on with getting organized, and getting components nipped out, trimmed and trial fitted. I'll report any anomalies or special difficulties that I encounter.

- - -

Unclear Engine Instructions


I may just not know enough about supercharged V-8 engine configurations, but I find the instructions for the optional engine build to be unclear. I can't make out how the engine is actually aspirated. I think I'll stick with the stock build.

- - -

A Wheels Warning

The wheel rims are closely attached to their sprue trees.


That makes nipping out the rims a bit dangerous, and I messed up a little when I applied my usual nipping method.


I distorted the edge of a rim with my side-cutting nipper.

I should have cut up the sprue tree at points well away from the wheel rim attachment points first; then sawn the wheel rims free with a razor saw; then trimmed off the remaining sprue with a knife. Next time I'll know better.

- - -

'Broke The Antenna -- MONDAY, NOVEMBER 26, 2018

And having just learned my lesson about freeing components from close, heavy sprue attachments, it seems that I still haven't learned. I broke the antenna when I nipped its lower sprue tree attachment. Again, beware of close, heavy sprue attachments and proceed with all due caution.

Poor Alignment Of Engine Block Halves

The engine block halves align poorly from front to rear. I cut off the two alignment pins, applied CA adhesive and lined up the halves by eye and by feel. I got a much better outcome than I would have by retaining the alignment pins.

- - -

The Engine So Far -- SATURDAY, APRIL 20, 2019


There's quite a ways to go yet.

- - -

A Shock Absorbers Detail

The instruction sheet would have one paint the rear shock absorbers orange all over; I don't think that's quite right. I opted to paint the shocks' cylindrical bodies orange, and the rods silver, like so.


- - -

The Engine Nearly Completed And Installed In The Chassis -- THURSDAY, OCTOBER 3, 2019


I don't know where AMT got the idea for a chrome-plated distributor cap -- surely no such thing exists in the real world. What an invitation to spark leakage a chrome-plated distributor cap would be. I should have painted it flat black or orange or something.

- - -

Rear Axle/Leaf Springs With Shocks And Drive Shaft -- MONDAY, OCTOBER 7, 2019


That installation is a bit tricky -- all four components must go together simultaneously, and then be glued in place.

- - -

Exhaust Pipes/Mufflers

They don't fit. Another little surprise from AMT.

I could conceivably try heating and reforming the engine ends of the pipes. I'd likely end up with a warped, distorted mess. I may pack up this wretched kit and retire it.

# # #


# # #


Thursday, November 8, 2018

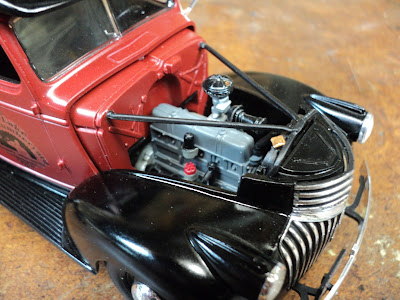
'41 Chevy Pickup -- Revell Kit No. 85-7202


'Still trying to develop a coherent protocol for building plastic kit models. My results to date have not been great. We'll see if I can do better with this one.

I'm thinking along these lines for an orderly approach to kit building:
  • Study the plan from beginning to end. Write in the colours alongside the colour code letters. I find it helpful to have the component colours spelled out.
  • Nip out all components in order from their trees. Bin them in labelled bins.
  • Trim sprue-joins and flash from all components in order.
  • Trial fit all components to their mating pieces. Pay close attention to how final assembly will be affected by paint thicknesses.
  • Trial assembly to the extent needed to confirm that major subassemblies will go together cleanly. That may require some gluing up that will later have to be taken apart -- a tricky bit of business.
  • Rig all components for painting and paint all components in order.
  • Final assembly.
We'll see how it goes.

Re "2 'n 1" Kit

The '41 Chevy Pickup kit offers stock and custom builds. I'll be building it strictly stock. The custom build variant differs from stock in the following areas:
  • Engine rocker cover.
  • Engine intake.
  • Wheels and tires.
  • Horn location.
- - -

Nipping Out
  • Generator: It's shown but not called out in drawing No. 1. It's item 31 on the tree with the chassis. It's meant to be semi-gloss black.
  • Chrome Door Handle, item 70: There are three of them; only two are needed.
  • Drawing No. 8 shows a rectangular opening to be cut in the model's floor. I can't make head or tail of that instruction. I'll just leave that be unless something turns up to give me a reason to do it.
Leftovers

If you build the stock version, you'll have left over:
  • Four low-profile tires.
  • Four chrome wheels.
  • Four inner wheels.
  • Chrome rocker cover.
  • Chrome air cleaner.
  • Dual carburetor.
- - -

Trial Fitting

The model has some ambiguous, iffy fits; examples are item 56, the tie rod, and item 57, the drag link. Beware.

A particularly egregious poor fit is the spare tire carrier, item 19. There's no way to securely close it up at its rear end. I think I'll end up securing it with a loop of 30 AWG copper wire, like so.


It's appalling that I have to do that. It's the sort of kit quality that I'd expect from AMT, not Revell.

- - -

Chassis To Fender Assembly Connection -- SUNDAY, NOVEMBER 18, 2018

The chassis does register to the fender assembly unambiguously, but holding the two together is problematic. A secure connection between those two components is a great help for further trial fitting of the cab and box.

I ended up screwing the two pieces together with a couple of 1.2mm x 4mm eyeglass screws. I used a No. 60 twist drill as a thread-size drill, and a No. 55 twist drill as a clearance-size drill. The polystyrene material is soft enough that the screws can be used as 'threading' screws -- there's no need to tap a female thread. It photographs poorly, but here's a view of the outcome.


Note the two tiny screw heads in the floor of the fender assembly. Those two screws are doing a fine job of securing the fender assembly to the chassis. They'll end up concealed under the cab's seat bottom.

To do such a screw connection, proceed as follows:
  • Glue the two pieces together temporarily with minimal applications of CA adhesive.
  • On the drill press, drill clear through both pieces No. 60.
  • Drill just through the floor No. 55.
  • Install the two screws to form the threads.
  • Remove the two screws and separate the pieces. Clean up the broken glue join areas.
That leaves you with two major, fundamental components of the model that you can screw together for further trial assembly, and for secure connection at final assembly -- a very satisfactory state of affairs indeed. See this post for more on the subject of making mechanical connections in kit models.

- - -

Tie Rod And Drag Link -- TUESDAY, NOVEMBER 27, 2018

Everything is painted and ready for final assembly.

I mentioned earlier that the tie rod's and the drag link's fits are iffy -- I can't make head or tail of how they are supposed to be installed. It looks like I'm just going to omit them entirely. Here's a scan of the pertinent part of the plan.


The parts are items 56 and 57 in section 2.

- - -

'Managed Them After All

Here they are cemented in place.


A bit questionable looking, perhaps, but all together.

- - -

Chassis Completed -- SATURDAY, DECEMBER 15, 2018

Here are some views of the finished chassis.


Note the 30 AWG wire loop securing the rear end of the spare tire holder.

Here's a view of the chassis with the fenders/floor attached.


Bumper-To Chassis Attachment -- SATURDAY, JANUARY 19, 2019

In a word, it's dreadful. It's a nasty piece of bits-and-pieces design that's very difficult to execute well.

Between the ends of the chassis rails and the bumpers themselves, there are four small 'bumper brackets' that must be glued in place. Their fits are ambiguous, and the strength of them is iffy. I did succeed in getting them on more-or-less correctly, but the final bumper attachments will lack truth.

At the rear brackets, I added M1.2 screws for reinforcement. It doesn't photograph well, but here's a view of one screw installation.


It's impossible to do that for the front brackets, and the front brackets are misshapen, resulting in an asymmetrical outcome.


I'd say that the bumper attachment scheme is by far the worst feature of the entire kit.

- - -

Interior Door Handles -- WEDNESDAY, JANUARY 23, 2019

The plan orients the interior door handles so they're pointing frontwards. That's not right -- it makes for what, in reality, would be interference between the door handles and the rotating window cranks. Orient the interior door handles so they're pointing downward or rearward.

Cab Fit

There's something wrong with the fit of the cab on the fender assembly, and I could find no way to correct it.


Note the tilt of the cab; it's evident at the lower edge of the cab. That's with the radiator support correctly installed, and the hood fitting properly. My attempts to understand and correct the flaw were fruitless. I settled on getting the radiator support correctly installed, and the hood's fit to be correct and then living with the tilt to the cab.

- - -

All Done -- FRIDAY, MARCH 22, 2019

Here are some views.


- - -

To be continued.

# # # 


# # #
Monday, October 29, 2018

First Generation Ford Bronco -- Revell Kit No. 85-4320


I've gotten some nasty surprises come final assembly time from Revell's and others' kits -- radiators that sit too high for hoods to close, and windshields that interfere with dashboards are notable ones.

It struck me that a way around that might be to fully assemble a kit (before painting any of it) with an adhesive that sticks but doesn't bond -- an adhesive that can be peeled off without damaging polystyrene components. That way, one could work out any misfits built into a kit, and be prepared for a trouble-free final assembly.

But what to use for an adhesive? White glue and carpenter's glue proved useless; they have zero adhesion to polystyrene. A couple of hobby shop's recommended Elmer's Tak'N Stik adhesive putty. I tried that and found it to be pretty much useless as well. It's too bulky, and it's insufficiently adhesive to polystyrene. I put the question toTamiya's tech support, and they recommended rubber cement.

So, I went to Michaels today and bought a 4 US fl oz bottle of Elmer's CraftBOND rubber cement. I'll try it out and we'll see if my idea for a trial building method will work. I certainly hope that it does, because I'm not too thrilled with the modeling results I've been getting to date, and I need to do much better than I have been.

- - -

Well, so much for that idea -- too messy. I'll just have to carry on and try to check for fit anomalies however I can. Past experience tells me to watch out for fit trouble in the following areas:
  • Engine and/or radiator height interfering with hood closure.
  • 'Glass', especially windshields, interfering with interior assembly fit.
  • Lack of registration/gluing-points for body-to-chassis connection. See this post for further elaboration on that.
- - -

Progress -- SUNDAY, NOVEMBER 11, 2018

Here's the chassis with the engine and one exhaust pipe installed.


I was pleasantly surprised to find that the exhaust pipe met up with its exhaust manifold satisfactorily. That tends to be an ambiguous point in a model's construction. Fortunately, it turned out right.

While fitting the exhaust pipe, I noticed a little detail that's worth paying attention to -- spacing between an exhaust pipe and a chassis.

It would have been easy to just cram the tail end of the exhaust pipe up against the chassis, but that wouldn't be right; no real vehicle has such an arrangement. So I took care to keep some space between the pipe and the chassis before gluing the pipe in place.


That's an exhaust pipe installation as it ought to be. Now I have to take care to get the other pipe in place with exactly the same spacing from the chassis.

- - -

A Paint Mishap

I painted both exhaust pipes at the same time with the same paint, but got two different shades of 'steel'.


I guess I must have done a non-uniform paint application from one pipe to the other. I didn't notice it until just now, with the pipes side-by-side in the chassis. There's no correcting the flaw now -- I'm stuck with it. 'Something to watch out for on future builds.

- - -

Chassis Completed -- MONDAY, NOVEMBER 12, 2018


'Pretty good. 'Not bad. 'Can't complain.

The suspension and steering linkage details of this kit are impressive. Some observations on other details:
  • The ignition coil's retaining strap begs to be picked out in silver, but I didn't feel up to the task, so I just left the ignition coil black overall.
  • I painted the shock absorbers yellow overall as per the plan, but that's really not right. The shock absorbers' anchor ends ought to be black, with only the bodies of the shock absorbers yellow. That would have been a tedious bit of business to execute, but well worthwhile.
  • As with most models of this scale, the wheels' axles leave a bit to be desired. They're tiny steel pins that make for pretty sloppy wheel mountings
 - - -

Interior Done And Fully Assembled -- TUESDAY, NOVEMBER 13, 2018


Note the flaw in my installation of the front seats' 'fabric' decals -- the driver's seat has a dark line where the seat back and seat bottom decals meet; the passenger seat has a white gap. By the time I saw that coming, it was too late to fix it.

A nice bit of extra detailing would have been to pick out the armrests and window cranks with paint, but I feared botching that, so I didn't try.

Next up is the dashboard.

- - -

Major Assemblies Together -- THURSDAY, NOVEMBER 15, 2018


So far, at least, it's not an embarrassment.

There are two long white decals to go along the lower length of the body's sides. I'm thinking that now would be a good time to install those, before any further, fragile details are added. These will be the biggest decals I've ever attempted. We'll see how it goes.

- - -

An Acceptable, If Imperfect, Decal Installation


It went better than I'd expected it to. Micro Set solution was helpful for getting conformance, though conformance remains a bit iffy around the front wheel. I'll give that a good long dry-out before I tackle the other side.

- - -

A Complication With The Right Side Body Decal

At the rear, the lower spare tire rack hinge interferes with the decal. I had to cut away the decal there.


I can't say that I did a good job of that. Some touching up with paint is in order to try to smooth that out.

Unsurprisingly, the plan mentions nothing about this snag. Beware.

- - -

Engine Bay Completed -- FRIDAY, NOVEMBER 16, 2018

Upper radiator hose, air cleaner, brake master cylinder and four tiny decals installed.


The upper radiator hose was a tight fit, but it did go into place as it ought to.

The plan calls for some additional engine bay paint detailing, but what's called for is beyond my brush painting skills. So, I've left it as you see it.

Grille And Front Bumper Installed


The body-to-chassis alignment/parallelism turned out very well, so the bumper's relationship to the body is as it ought to be.

- - -

Rear End Fully Assembled And Decaled -- SATURDAY, NOVEMBER 17, 2018


Note the flaw -- the bumper is out of parallel with the tailgate.

- - -

Flaw Corrected -- SATURDAY, NOVEMBER 24, 2018


That flaw was bugging me, so I broke off the bumper and carved down the top of the left side chassis protrusion where it mates with the bumper. That let me lower the left side of the bumper, and get the bumper parallel to the tailgate. Much better.

- - -

All Done


There are many little flaws, but it's easily my best model build so far.

On to the next ones.


# # #


# # #