I've gotten some nasty surprises come final assembly time from Revell's and others' kits -- radiators that sit too high for hoods to close, and windshields that interfere with dashboards are notable ones.
It struck me that a way around that might be to fully assemble a kit (before painting any of it) with an adhesive that sticks but doesn't bond -- an adhesive that can be peeled off without damaging polystyrene components. That way, one could work out any misfits built into a kit, and be prepared for a trouble-free final assembly.
But what to use for an adhesive? White glue and carpenter's glue proved useless; they have zero adhesion to polystyrene. A couple of hobby shop's recommended Elmer's Tak'N Stik adhesive putty. I tried that and found it to be pretty much useless as well. It's too bulky, and it's insufficiently adhesive to polystyrene. I put the question toTamiya's tech support, and they recommended rubber cement.
So, I went to Michaels today and bought a 4 US fl oz bottle of Elmer's CraftBOND rubber cement. I'll try it out and we'll see if my idea for a trial building method will work. I certainly hope that it does, because I'm not too thrilled with the modeling results I've been getting to date, and I need to do much better than I have been.
- - -
Well, so much for that idea -- too messy. I'll just have to carry on and try to check for fit anomalies however I can. Past experience tells me to watch out for fit trouble in the following areas:
- Engine and/or radiator height interfering with hood closure.
- 'Glass', especially windshields, interfering with interior assembly fit.
- Lack of registration/gluing-points for body-to-chassis connection. See this post for further elaboration on that.
- - -
Progress -- SUNDAY, NOVEMBER 11, 2018
Here's the chassis with the engine and one exhaust pipe installed.
I was pleasantly surprised to find that the exhaust pipe met up with its exhaust manifold satisfactorily. That tends to be an ambiguous point in a model's construction. Fortunately, it turned out right.
While fitting the exhaust pipe, I noticed a little detail that's worth paying attention to -- spacing between an exhaust pipe and a chassis.
It would have been easy to just cram the tail end of the exhaust pipe up against the chassis, but that wouldn't be right; no real vehicle has such an arrangement. So I took care to keep some space between the pipe and the chassis before gluing the pipe in place.
That's an exhaust pipe installation as it ought to be. Now I have to take care to get the other pipe in place with exactly the same spacing from the chassis.
- - -
A Paint Mishap
I painted both exhaust pipes at the same time with the same paint, but got two different shades of 'steel'.
I guess I must have done a non-uniform paint application from one pipe to the other. I didn't notice it until just now, with the pipes side-by-side in the chassis. There's no correcting the flaw now -- I'm stuck with it. 'Something to watch out for on future builds.
- - -
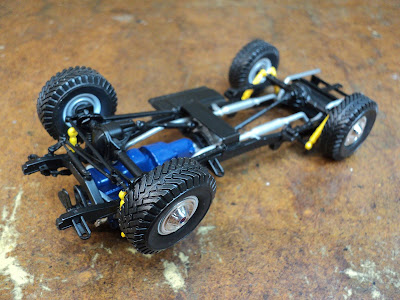
Chassis Completed -- MONDAY, NOVEMBER 12, 2018
'Pretty good. 'Not bad. 'Can't complain.
The suspension and steering linkage details of this kit are impressive. Some observations on other details:
- The ignition coil's retaining strap begs to be picked out in silver, but I didn't feel up to the task, so I just left the ignition coil black overall.
- I painted the shock absorbers yellow overall as per the plan, but that's really not right. The shock absorbers' anchor ends ought to be black, with only the bodies of the shock absorbers yellow. That would have been a tedious bit of business to execute, but well worthwhile.
- As with most models of this scale, the wheels' axles leave a bit to be desired. They're tiny steel pins that make for pretty sloppy wheel mountings
- - -
Interior Done And Fully Assembled -- TUESDAY, NOVEMBER 13, 2018
Note the flaw in my installation of the front seats' 'fabric' decals -- the driver's seat has a dark line where the seat back and seat bottom decals meet; the passenger seat has a white gap. By the time I saw that coming, it was too late to fix it.
A nice bit of extra detailing would have been to pick out the armrests and window cranks with paint, but I feared botching that, so I didn't try.
Next up is the dashboard.
- - -
Major Assemblies Together -- THURSDAY, NOVEMBER 15, 2018
So far, at least, it's not an embarrassment.
There are two long white decals to go along the lower length of the body's sides. I'm thinking that now would be a good time to install those, before any further, fragile details are added. These will be the biggest decals I've ever attempted. We'll see how it goes.
- - -
An Acceptable, If Imperfect, Decal Installation
It went better than I'd expected it to. Micro Set solution was helpful for getting conformance, though conformance remains a bit iffy around the front wheel. I'll give that a good long dry-out before I tackle the other side.
- - -
A Complication With The Right Side Body Decal
At the rear, the lower spare tire rack hinge interferes with the decal. I had to cut away the decal there.
I can't say that I did a good job of that. Some touching up with paint is in order to try to smooth that out.
Unsurprisingly, the plan mentions nothing about this snag. Beware.
- - -
Engine Bay Completed -- FRIDAY, NOVEMBER 16, 2018
Upper radiator hose, air cleaner, brake master cylinder and four tiny decals installed.
The upper radiator hose was a tight fit, but it did go into place as it ought to.
The plan calls for some additional engine bay paint detailing, but what's called for is beyond my brush painting skills. So, I've left it as you see it.
Grille And Front Bumper Installed
The body-to-chassis alignment/parallelism turned out very well, so the bumper's relationship to the body is as it ought to be.
- - -
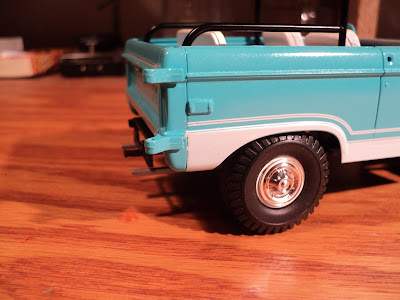
Rear End Fully Assembled And Decaled -- SATURDAY, NOVEMBER 17, 2018
Note the flaw -- the bumper is out of parallel with the tailgate.
- - -
Flaw Corrected -- SATURDAY, NOVEMBER 24, 2018
That flaw was bugging me, so I broke off the bumper and carved down the top of the left side chassis protrusion where it mates with the bumper. That let me lower the left side of the bumper, and get the bumper parallel to the tailgate. Much better.
- - -
All Done
There are many little flaws, but it's easily my best model build so far.
On to the next ones.
# # #
# # #


